CentOS 에 ORACLE 을 설치하는 방법입니다.
터미널에 X 기능을 추가한 뒤 Xwindows 기능을 이용하여 설치를 진행합니다.
서버 |
CentOS Linux release 7.5.1804 |
데이터베이스 |
Oracle Database 12c Release 2 (12.2.0.1.0) |
다운로드 방법
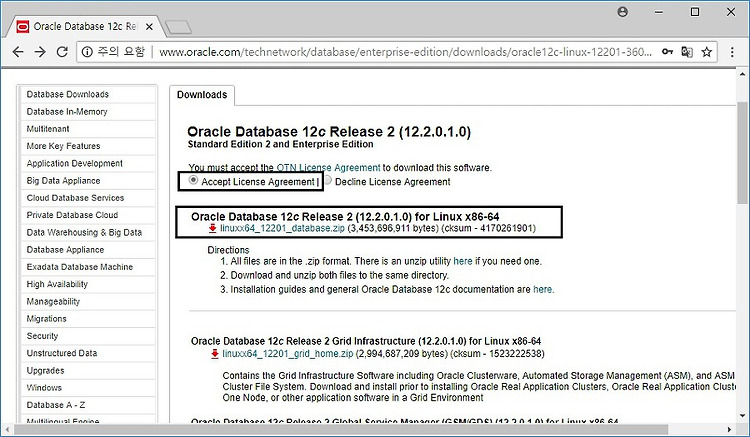
1. 사이트에 접속한 뒤 다운로드를 진행합니다.
http://www.oracle.com/technetwork/database/enterprise-edition/downloads/oracle12c-linux-12201-3608234.html
2. 다운로드 한 zip 파일을 서버로 전송합니다.
설치 방법
1. zip 파일을 해제합니다.
$ ls
linuxx64_12201_database.zip

$ unzip linuxx64_12201_database.zip
2. 생성된 database 폴더에 들어간 뒤 runInstaller 를 실행합니다.
$ ./runInstaller
만약 X11 이 설치되어 있지 않은 경우, 아래와 같은 창을 볼 수 있습니다. 이 때는 X11(=Xming) 을 설치하고 runInstaller 를 실행합니다.
https://sourceforge.net/projects/xming/
3. 서비스 받을 이메일을 등록하는 부분이므로, 빈란으로 두고 넘어갑니다. 정말 안받을건지 묻는데 안받는다고 하고 넘어갑니다.
4. 데이터베이스를 생성 및 구성해야하므로 첫번째를 클릭 후 넘어갑니다.
5. 리눅스 서버용을 선택합니다.
6. 오라클 CLUSTER 나 RAC 설치가 아니기 때문에, 첫번째를 클릭 후 넘어갑니다.
7. Typical install 를 선택 후 넘어갑니다.
설정을 세세하게 하고싶다 하시는 분은 Advanced install 를 선택 후 넘어갑니다. ( 여기서는 Advanced Install 에 대해 설명하지 않습니다. )
8. 비밀번호는 필수로 입력한 뒤, 경로 혹은 데이터베이스 명 등 옵션을 설정합니다.
오라클 권고사항을 따르지 않으면 경고가 나오는데 무시하시면 됩니다.
9. 넘어갑니다.
10. 오라클이 커널값과 라이브러리 시스템 등을 체크한 뒤 적절치 않으면 경고를 냅니다.
이로인해 운영을 못하지는 않으니 Ignore All 을 눌러주고 넘어갑니다.
경고창이 나오는데 무시하시면 됩니다.
11. 이렇게 설치할거다 라는 내용이 나옵니다. Install 을 눌러주시면 됩니다. ( 메모리 엄청 잡네요. )
12. 설치가 진행됩니다.
13. 설치가 진행되다가 root 권한이 필요하다고 창이 나옵니다. root 로 접속해서 스크립트를 실행한 뒤 OK 버튼을 눌러줍니다.
# sh orainstRoot.sh
Changing permissions of /data/oracle/app/oraInventory.
Adding read,write permissions for group.
Removing read,write,execute permissions for world.

Changing groupname of /data/oracle/app/oraInventory to oracle.
The execution of the script is complete.
# sh root.sh
Performing root user operation.

The following environment variables are set as:
    ORACLE_OWNER= oracle
    ORACLE_HOME=  /data/oracle/app/oracle/product/12.2.0/dbhome_1

Enter the full pathname of the local bin directory: [/usr/local/bin]: /data/oracle/local/bin
   Copying dbhome to /data/oracle/local/bin ...
   Copying oraenv to /data/oracle/local/bin ...
   Copying coraenv to /data/oracle/local/bin ...


Creating /etc/oratab file...
Entries will be added to the /etc/oratab file as needed by
Database Configuration Assistant when a database is created
Finished running generic part of root script.
Now product-specific root actions will be performed.
Do you want to setup Oracle Trace File Analyzer (TFA) now ? yes|[no] :
no
Oracle Trace File Analyzer (TFA - User Mode) is available at :
    /data/oracle/app/oracle/product/12.2.0/dbhome_1/suptools/tfa/release/tfa_home/bin/tfactl

OR

Oracle Trace File Analyzer (TFA - Daemon Mode) can be installed by running this script :
/data/oracle/app/oracle/product/12.2.0/dbhome_1/suptools/tfa/release/tfa_home/install/roottfa.sh14. 설치가 다 되었으면 close 버튼을 누른뒤 종료합니다.
15. .bashrc 혹은 .bash_profile 에 오라클 환경변수를 잡아줍니다.
export LANG=C
export ORACLE_BASE=/data/oracle/app/oracle
export ORACLE_HOME=$ORACLE_BASE/product/12.2.0/dbhome_1
export PATH=$ORACLE_HOME/bin:$PATH
export LD_LIBRARY_PATH=$ORACLE_HOME/lib:$LD_LIBRARY_PATH
export LD_LIBRARY_PATH=$ORACLE_HOME/odbc/lib:$LD_LIBRARY_PATH
export ORACLE_SID=orcl
16. sqlplus 명령어를 사용하여 오라클에 접속합니다.
$ sqlplus "/as sysdba"

SQL*Plus: Release 12.2.0.1.0 Production on Mon Aug 6 16:08:01 2018

Copyright (c) 1982, 2016, Oracle.  All rights reserved.


Connected to:
Oracle Database 12c Enterprise Edition Release 12.2.0.1.0 - 64bit Production

SQL>
'Database > Oracle' 카테고리의 다른 글
| [ORACLE] SQL-02122: Invalid OPEN or PREPARE for this database connection 해결하기 (0) | 2018.07.27 |
|---|---|
| [ORACLE] CONNECT BY 함수 사용하기 (0) | 2018.07.24 |
| [ORACLE] SQL 의 자주쓰는 명령어 모음 (0) | 2018.07.24 |
| [ORACLE] 컬럼의 데이터가 아래줄에 출력될 때, 데이터 출력 화면 조정하기 (0) | 2018.06.18 |
| [ORACLE] Architecture, Background Process, 아키텍처, 백그라운드 프로세스 (0) | 2018.06.04 |


